Jonathon Klem
Using AWS To Test Upgrades
Dec 28, 2014
The most unnerving task that I have to perform on at least a weekly basis is pushing updates and changes to production servers. With a great deal of preparation and planning the amount of headaches involved with this task can be almost eliminated and downtime can be avoided, but every so often issues spring up where differences between the development environment and the production environment can cause issues or some hiccup in the change process itself could cause downtime. There are several good methods and tools for covering your bases and avoiding this, but recently I was able to perform a major server upgrade for a client that was using an ec2 server that was so painless I was inspired to write about the process. This will not be a highly technical article, but will showcase how to use elastic IP addresses and AMIs to perform seamless upgrades and testing.
Elastic IPs
One really awesome feature of working with AWS has the ability to have elastic IP addresses that you can associate and disassociate with running ec2 instances on the fly. You can 'move' IP addresses with other services like Rackspace, but unlike with Rackspace, you don't have to open up a service ticket with AWS. You simply transfer the IP address over.
If you haven't done so already, put an elastic IP address on your ec2 instances. You only have to pay extra for elastic IP addresses that are not attached to a running instance. If you keep your instance on 24/7 (most server situations), there is no price difference.
You can access this panel from the ec2 dashboard on the left side under the "network and security" tab. The interface couldn't be simpler. Simply click "Allocate New Address" and then after it's created click "Associate Address" to connect it to your running ec2 instance. This will cause you to lose your old public IP address and will result in downtime until you update your DNS record, so do this with great caution. I recommend using an using elastic IP addresses for all servers as soon as you create them so as to avoid downtime in the future.

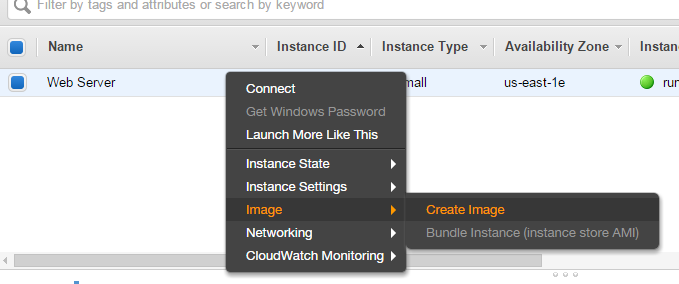
This allows you to take a snapshot of a running server. Once the snapshot is created, you can launch a clone of this AMI and have a 1:1 match of your production server. To create an AMI, right click on your running ec2 instance, navigate to "Image" and then "Create Image".

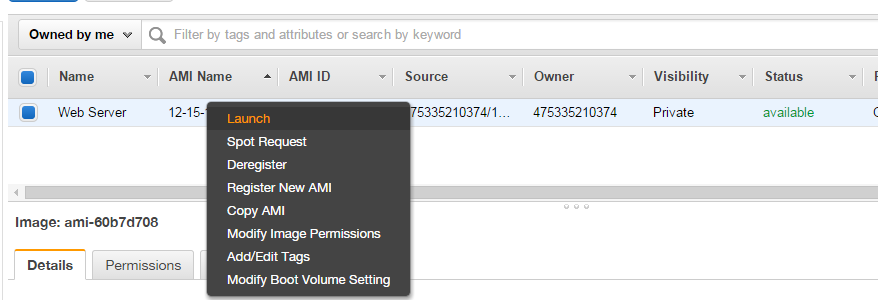
This process will take some time. You can check its progress under "Images" -> "AMIs" in the left hand pane. Once the AMI is ready to launch, the status will say "available". Now we can create a clone of our production server by right clicking and selecting "Launch".

You'll be presented with the same options as when you create a normal ec2 instance. This is the only process that's not automated and you'll want to take extra care to match your original server's instance type and any other special settings that you may have altered.
The Upgrade Process and Switch
Once you've spun up the clone, you can access it however you would the production server (mysql, ssh, ftp, ...) and perform the necessary changes. You can modify your local hosts file and do all the testing that you need to on this cloned server without having to worry about the production server going down.
Once the changes have been done and you're satisfied that nothing broke, all that's left is to switch the IP address over. To do this, you go to the same EIP panel that we used to create our elastic IP address. You click the IP address you want to re-associate, and click the "Associate Address" button.

Once the IP address has been re-associated and you've confirmed that everything is running fine, you can shut down and terminate the old instance. If you have any questions or comments you can email me at jonathonklem@gmail.com.